Importing Weights

Hello Everyone! We're pushing out updates to HerdOne based on your requests, and it seemed like several of you were looking for a way to add multiple livestock weights at once. You spoke, we listened! Introducing our new "Import Weights" template!

So, we've changed things up a bit. Remember the "Import Livestock" template that we talked about in our last post? We're combining these imports on the same "Import" page. We've reorganized the "Manage Livestock" menu item to be more organized, so this page is now under Manage Livestock > Add > Imports, like so:

This looks very similar to what we had before. This time, though, there is a drop down for you to choose from. If you want to download the Livestock template, select it from the drop down, and if you want to download the Weights template, select that from the drop down. Once you have your selection made, which will be the weights in this case, hit the “Download Template” button. This will download our “Import Weights” Microsoft Excel template to your computer.

You will have to enable editing to begin working on the spreadsheet. Oh, and if you get the following error message, no worries! Read on…

To keep HerdOne and your information secure, we’ve protected these sheets so that you can only edit certain cells. If you get this error message, you’ve tried to edit a cell that you are not allowed to edit. Just click OK and select only relevant cells.

Anyways, we’re getting side-tracked. The template is pretty intuitive. Follow the instructions at the top of the spreadsheet carefully. Each column, ID, Weight, and Date, are required fields and you can only import 250 weights at a time. Here’s a sample import that I created:

Save your work, and then go back to the Imports page and upload it using the tools in Step 3. Don’t worry about selecting the right type of template in the drop down at the top. Our site is smart enough to tell from your Excel sheet which kind of template it is.

So, once I’ve imported my sample data, this is what shows up!

If I had missed an ID, Weight, or Date for any of the entries, I would get a message like this:

The message will tell you which record, or Excel row, has the issue, and it will tell you what went wrong so that you can either go back and change it, or add it through the HerdOne website. Keep in mind that if you import the same template twice, you will be entering all of these weights two times.

*Edit*

Our latest release for HerdOne (version 1.1.1) adds a "Type" column to this import template which lets you select what kind of weight you want to import: Birth Weight, Check Weight, or Wean Weight. This makes it so you can import all kinds of weights at once! We hope this new addition is helpful!

Well, that’s all I have for you today! I hope this post was helpful and that this new feature will make things easier for your livestock management.

As always, if you have any questions, do not hesitate to email us at support@herdone.com or leave a comment below!

Best wishes!

Kasey

Import Livestock

We have some exciting news! We heard that some of you are looking for a way to add several animals at once without having to add them each individually. The "Add Bulk Livestock" page is all fine and good, but it just hasn't been the best way to add lots of different livestock at the same time. And what if you have an existing spreadsheet with information about livestock, and you want to transfer those over to HerdOne? Introducing our new Import Livestock Template!

Import Livestock Page

To get to this template, navigate to the Import Livestock page by clicking the link to it in the "Add Bulk Livestock" page or by signing in and clicking the following link:

Import Livestock Link

Now that you are on the page, follow the instructions and download our template (this template is in Microsoft Excel 2007 or later versions).  

Make sure when you first open the template that you click "Enable Editing" in Excel.

Make sure you read all of those instructions in the red block at the top. These are extremely important to follow. Here are a few things to be thinking about while you fill out the template:

  • The only required fields are ID, Type, Category, Breed, and Gender. If any of these required fields are left blank or have incorrect entries, the import process will not save that livestock and will move on to the next record.
  • Any other incorrect field is processed as a blank entry.
  • The "IsOwned" column at the very end defaults to true. You normally don't want to change it to anything else. It is only for livestock that you have never had on your farm. Leave it true or blank even if the livestock is sold or lost. The livestock was still owned by you at some point in its life. 
  • Unowned livestock are primarily used for recording a livestock's parents that were not owned by you. This is why the "IsDamOwned" and "IsSireOwned" fields exist. If the sire or dam are not owned by you, make a record for them, and make the "IsOwned" column false.
  • Do not set an animal's sire or dam without creating a record for it. Either it has to already exist in your account, or it has to be located in the import livestock template, even if it is not owned.
  • The maximum number of livestock you can import at once is 250.

Besides that, just fill in all the information you want or need, or paste it in from another spreadsheet!

*Note: When you add an animal that is not owned, it will not be included in your livestock count for your subscription. It has no effect on the amount of livestock your are managing as far as cost goes.

An unowned animal shows up like this on the grid in Livestock View:

Upload and Import

Now that you've filled out the template, save it and upload it back into the Import Livestock page. The website will give you a detailed message about what happened during the import process. It will tell you if you were missing any required fields, if it could not find the dam or sire, or if something else went wrong.

To demonstrate, here is a template I filled out and imported into my account:

Continued...

Notice that the last record does not have an ID, and the livestock with the ID 22 (Jack) has a breed that is misspelled. Also notice that I did not fill out all the fields: only the ones that were necessary.

Here is the message that I received after importing these livestock:

Records 4 and 5 were still imported, but the system just couldn't find the pasture I gave it. I can change that later in the Livestock View page, or in the Manage Animal pages for those livestock.

And just as we suspected, the two records that were not imported, records 6 and 9, were the ones that I pointed out with errors in their required fields.

Now you know how to import livestock through an Excel template into your HerdOne account!

Thanks for reading, and if you have any questions, comment below or email us at support@herdone.com.

Best wishes!

Kasey

Pedigree Charts

Wouldn't it be nice to be able to see an animal's pedigree all in one place? Good news! We've just added a feature where you can view and edit a livestock's pedigree from its Manage Animal page. It's clean, changeable, and already formatted for you! Here's how you can build that pedigree.

Manage Animal

First of all, go to your animal's Manage Animal page. Scroll down to the bottom of the Manage Animal page and click the "Pedigree" tab. If you've already specified what the animal's parents are, this tab will have a system-generated pedigree chart. This is just the system's best guess, so if it gets it wrong, no problem! We'll talk about editing your pedigree chart in a bit. If your animal has a dam and sire assigned to it, you'll see a new entry labeled "Go To Pedigree Chart" in the Pedigree Info box at the top. Clicking that link will scroll you right down to the pedigree chart and open that tab.
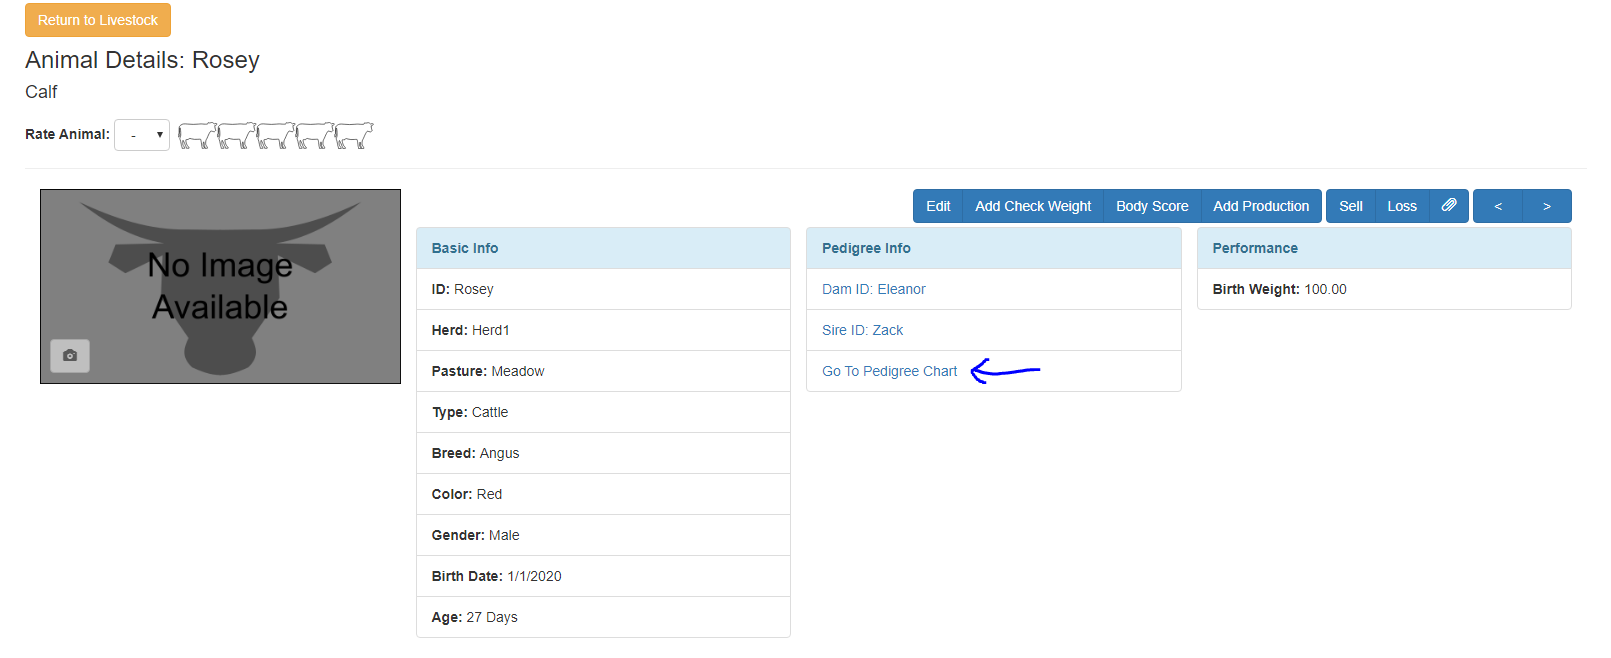


In this example, Rosey's parents are Eleanor and Zack. If I go to her pedigree chart, this is what is displayed: 
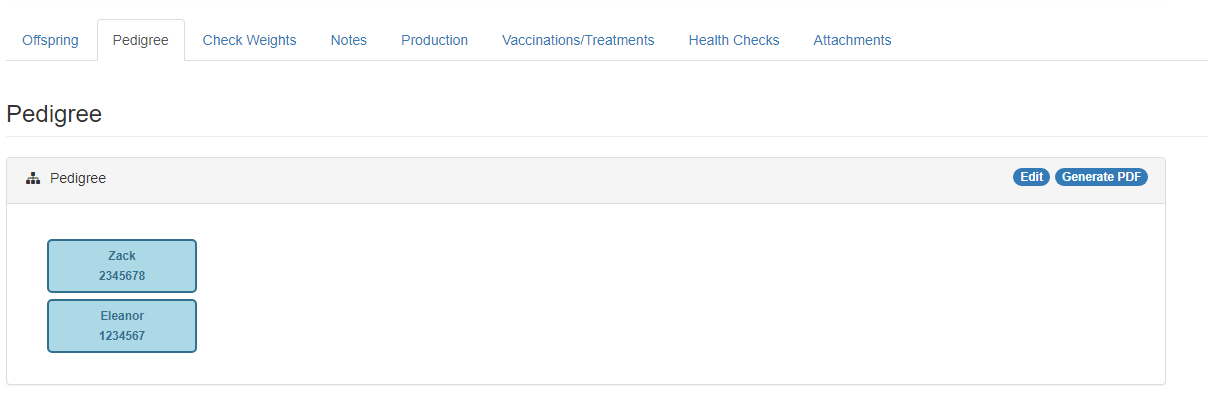
Notice that the sire will always be on the top, and the dam will always be on the bottom. The top of an animal's block displays its Name or ID and the bottom of the block displays its registration number.

That looks nice, you might say, but how do you edit it to go further down...or up...the line?

I'm glad you asked!

Editing the Pedigree Chart

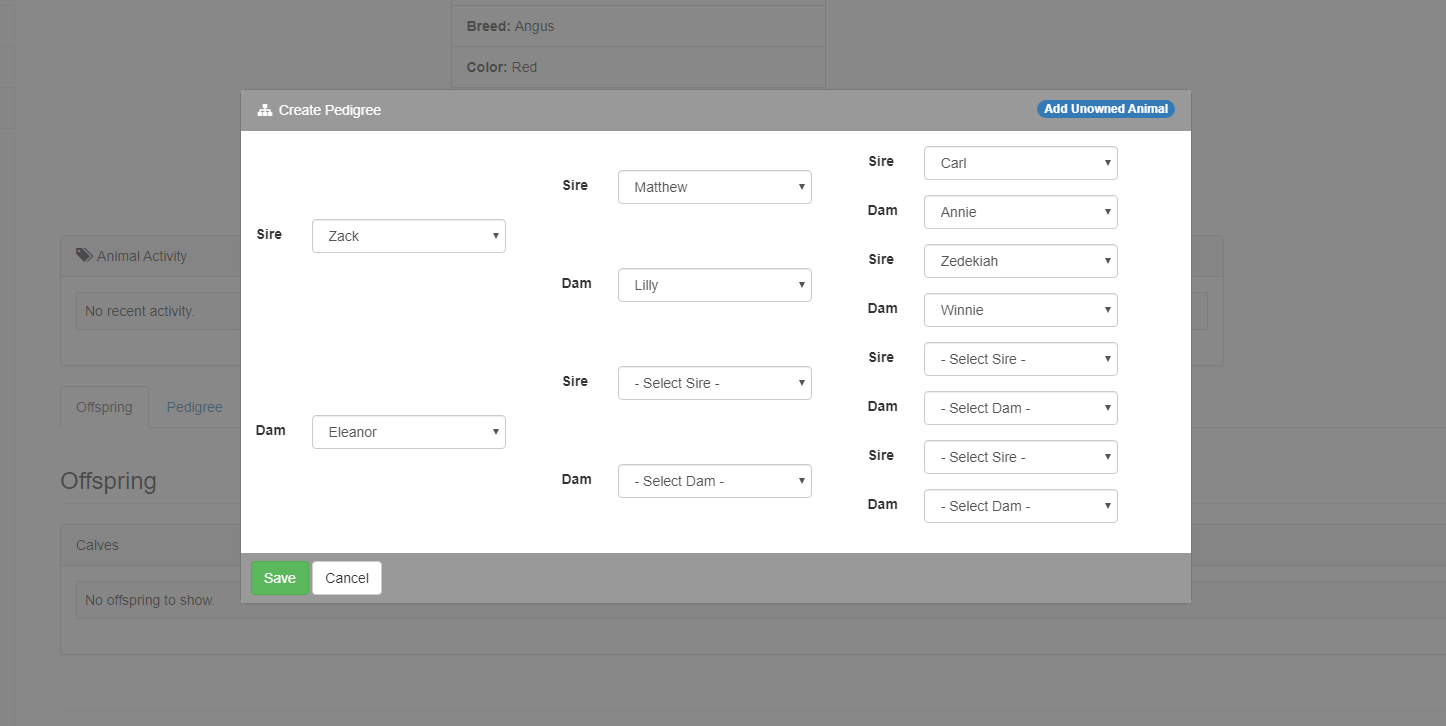
So, Rosey's parents are Zack and Eleanor. Now I want to record who Zack and Eleanor's parents are, and who their parents are. Our feature goes three levels deep, from the animal to its great grandparents.

Go ahead and click that "Edit" button on the top right of the pedigree chart panel. You'll see this popup:
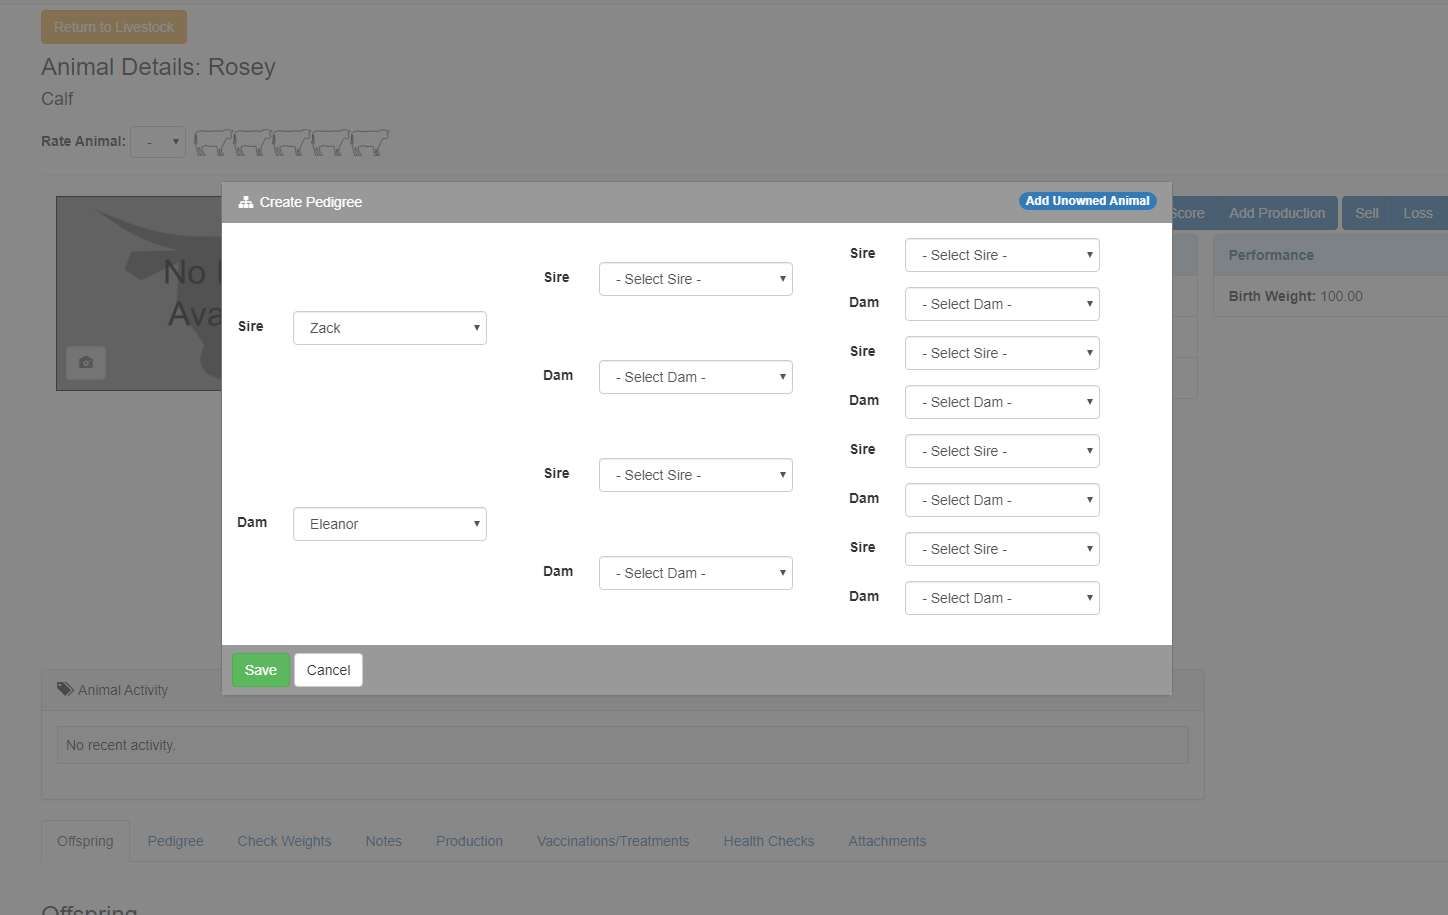
From here, you can fill in all the drop downs, and it will be saved to your animal's record! If you choose an animal that already has parents assigned, the popup will update and place those parents inside the associated parent fields. You can override these though if you need to.

Here is a picture of Zack's ancestry after I populated all the drop downs:
Here's a question...what if you don't own the animal's parents, but you still want to record them in the pedigree chart? That's exactly what that little "Add Unowned Animal" button is for on the top right of the popup.

Adding an Unowned Animal

If you click that button. You'll see this form:
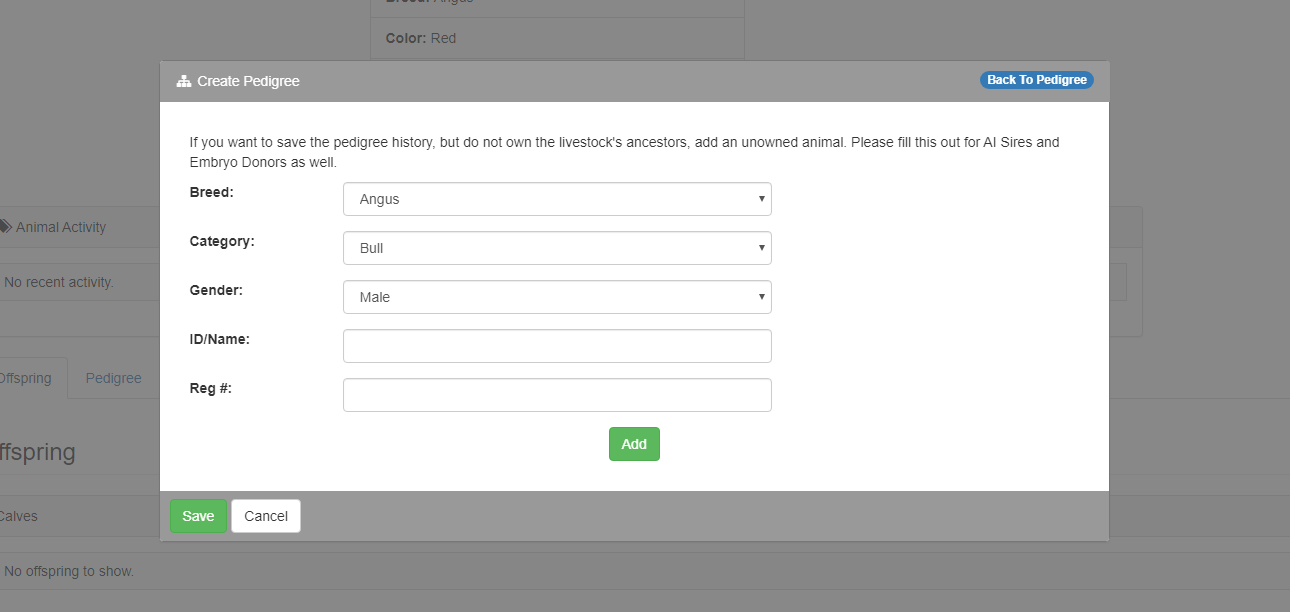
It's just the bare minimum amount of information we need to be able to record an unowned livestock. And don't worry. This will not be included in your livestock number for your subscription level. It has no effect on the amount of livestock your are managing as far as cost goes!

You may have noticed that AI Sires and Embryo Donors do not appear in the drop downs. To include them in this pedigree chart, you will need to create unowned animal records for them. It's the best way we could find to connect the two.

Fill the form out and click "Add." You'll be taken back to the original screen, and now your unowned animal will show up in the drop downs! In this example, I added two new unowned animals to be Eleanor's parents: Brad and Mina.
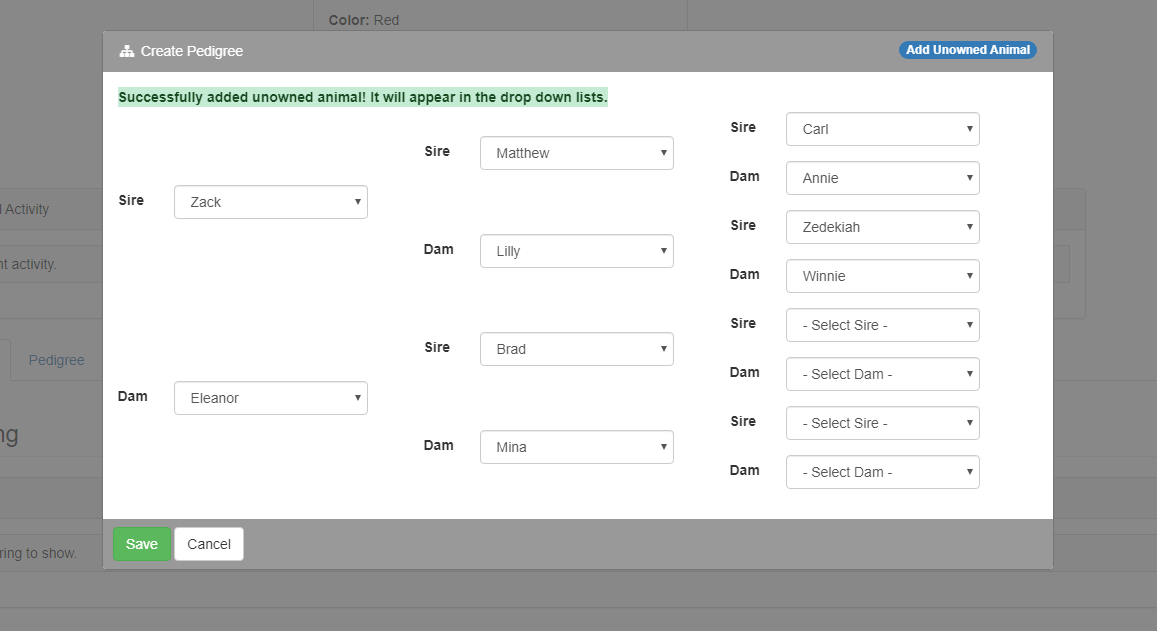
*Note that you can now also add an unowned animal from the "Add Animal" page.

You don't have to fill out the entire form. In my example, this is as far as I want to go. This is what my chart looked like after clicking "Save":
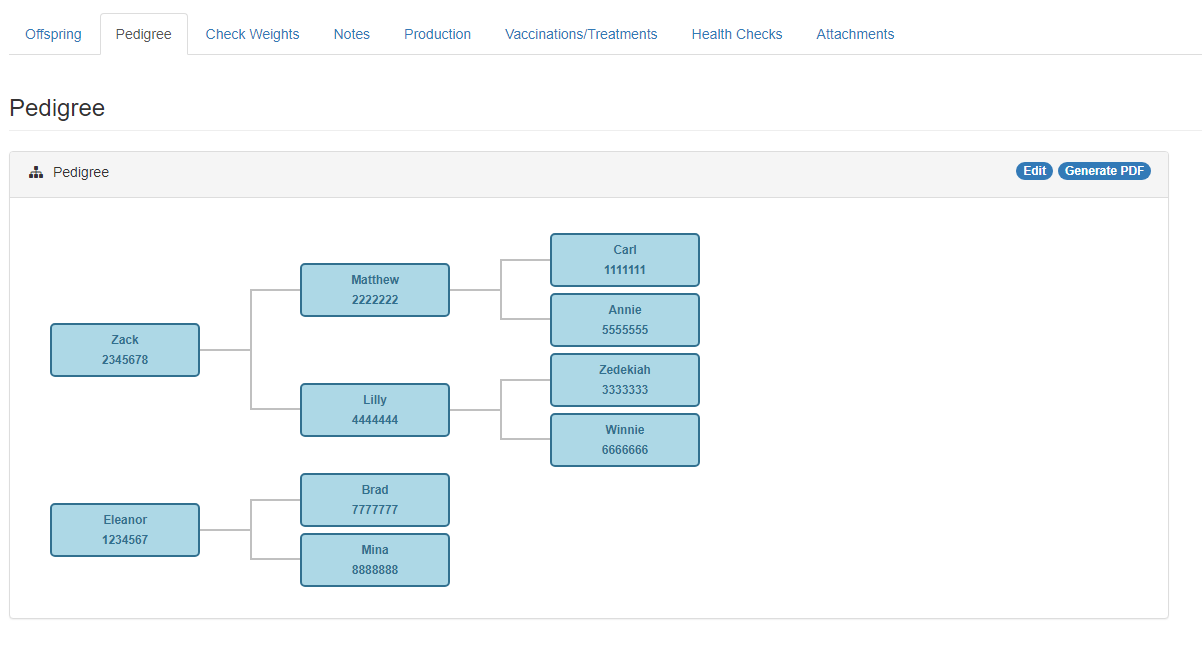
You can even print a PDF of this information. Click the "Generate PDF" button and a PDF will be downloaded to your computer.

So there you have it! We hope you enjoy this new feature and that it saves you lots of time! If you have any questions, comment below or email us at support@herdone.com.

Happy Farming!

Kasey


Treatment Inventory

For HerdUnlimited subscribers, our latest version of HerdOne includes a helpful new page called Treatment Inventory, where you can keep track of all your medicines/treatments for your animal's vaccinations. This tool keeps a running list of all your treatments, their types, costs, and amounts. Once you have filled out information about your treatments, you can go to the Vaccination/Treatments page and select the treatment you want to give to an animal or animal group and our software will track how much you used, how much is left in the container, and how much that vaccination cost you.

Treatment Inventory Page

To get started, go to Vaccines and Health Checks > Treatment Inventory and add a new Treatment. Your first entry will require you to create a Treatment Type so select "Create New." Select the type of Treatment you want: Drench, Injectable, Ingestible, Pour-On, or Spray. Then give it a name.

Congratulations! You've created your first Treatment Type. Now you'll move onto the specifics of this treatment container. Enter the Lot Number, the Amount that's in the container, and your Unit of Measurement. Then fill out the Expense-related information: Vendor, Price, and Date.

Your entry will appear on the top of the page in the grid:

Vaccinations/Treatments Page

Now that you have your first Treatment, you are ready to give a Vaccine to one of your animals. Head over to the Vaccination/Treatment page, and begin filling out vaccination information. You'll notice a new section right under the "Optional" button. The Treatment information is optional, but if you fill out one box, you must fill out the other too. 

After submitting your Vaccination, HerdOne will calculate the cost of the Vaccination which will show up on the grid at the top of the page. If you head back to grid on the Treatment Inventory page, it will display the amount left and give you a nice overview of all your Treatments.

And that's it! You can also add vaccinations with treatment information on a specific animal's Manage Animal page, and you can run a report on your vaccinations and treatments on the Reports page.

If you have any questions or comments, please let us know at support@herdone.com.

Happy Farming!

Kasey