Import Livestock

We have some exciting news! We heard that some of you are looking for a way to add several animals at once without having to add them each individually. The "Add Bulk Livestock" page is all fine and good, but it just hasn't been the best way to add lots of different livestock at the same time. And what if you have an existing spreadsheet with information about livestock, and you want to transfer those over to HerdOne? Introducing our new Import Livestock Template!

Import Livestock Page

To get to this template, navigate to the Import Livestock page by clicking the link to it in the "Add Bulk Livestock" page or by signing in and clicking the following link:

Import Livestock Link

Now that you are on the page, follow the instructions and download our template (this template is in Microsoft Excel 2007 or later versions).  

Make sure when you first open the template that you click "Enable Editing" in Excel.

Make sure you read all of those instructions in the red block at the top. These are extremely important to follow. Here are a few things to be thinking about while you fill out the template:

  • The only required fields are ID, Type, Category, Breed, and Gender. If any of these required fields are left blank or have incorrect entries, the import process will not save that livestock and will move on to the next record.
  • Any other incorrect field is processed as a blank entry.
  • The "IsOwned" column at the very end defaults to true. You normally don't want to change it to anything else. It is only for livestock that you have never had on your farm. Leave it true or blank even if the livestock is sold or lost. The livestock was still owned by you at some point in its life. 
  • Unowned livestock are primarily used for recording a livestock's parents that were not owned by you. This is why the "IsDamOwned" and "IsSireOwned" fields exist. If the sire or dam are not owned by you, make a record for them, and make the "IsOwned" column false.
  • Do not set an animal's sire or dam without creating a record for it. Either it has to already exist in your account, or it has to be located in the import livestock template, even if it is not owned.
  • The maximum number of livestock you can import at once is 250.

Besides that, just fill in all the information you want or need, or paste it in from another spreadsheet!

*Note: When you add an animal that is not owned, it will not be included in your livestock count for your subscription. It has no effect on the amount of livestock your are managing as far as cost goes.

An unowned animal shows up like this on the grid in Livestock View:

Upload and Import

Now that you've filled out the template, save it and upload it back into the Import Livestock page. The website will give you a detailed message about what happened during the import process. It will tell you if you were missing any required fields, if it could not find the dam or sire, or if something else went wrong.

To demonstrate, here is a template I filled out and imported into my account:

Continued...

Notice that the last record does not have an ID, and the livestock with the ID 22 (Jack) has a breed that is misspelled. Also notice that I did not fill out all the fields: only the ones that were necessary.

Here is the message that I received after importing these livestock:

Records 4 and 5 were still imported, but the system just couldn't find the pasture I gave it. I can change that later in the Livestock View page, or in the Manage Animal pages for those livestock.

And just as we suspected, the two records that were not imported, records 6 and 9, were the ones that I pointed out with errors in their required fields.

Now you know how to import livestock through an Excel template into your HerdOne account!

Thanks for reading, and if you have any questions, comment below or email us at support@herdone.com.

Best wishes!

Kasey

Pedigree Charts

Wouldn't it be nice to be able to see an animal's pedigree all in one place? Good news! We've just added a feature where you can view and edit a livestock's pedigree from its Manage Animal page. It's clean, changeable, and already formatted for you! Here's how you can build that pedigree.

Manage Animal

First of all, go to your animal's Manage Animal page. Scroll down to the bottom of the Manage Animal page and click the "Pedigree" tab. If you've already specified what the animal's parents are, this tab will have a system-generated pedigree chart. This is just the system's best guess, so if it gets it wrong, no problem! We'll talk about editing your pedigree chart in a bit. If your animal has a dam and sire assigned to it, you'll see a new entry labeled "Go To Pedigree Chart" in the Pedigree Info box at the top. Clicking that link will scroll you right down to the pedigree chart and open that tab.


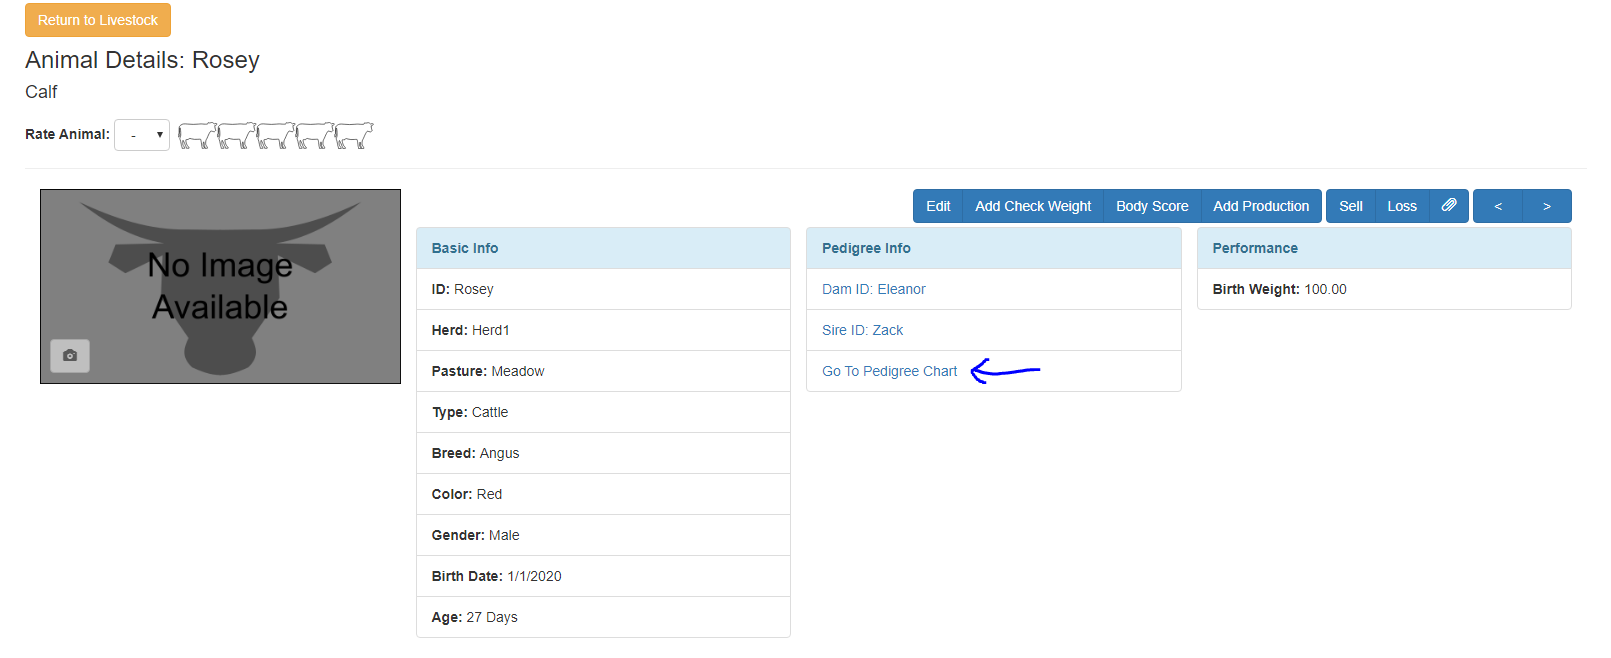
In this example, Rosey's parents are Eleanor and Zack. If I go to her pedigree chart, this is what is displayed: 

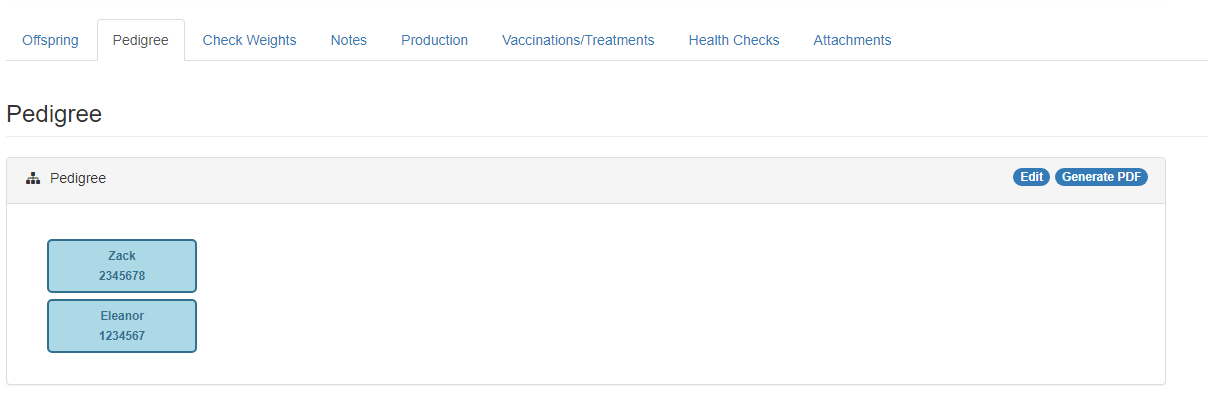
Notice that the sire will always be on the top, and the dam will always be on the bottom. The top of an animal's block displays its Name or ID and the bottom of the block displays its registration number.

That looks nice, you might say, but how do you edit it to go further down...or up...the line?

I'm glad you asked!

Editing the Pedigree Chart

So, Rosey's parents are Zack and Eleanor. Now I want to record who Zack and Eleanor's parents are, and who their parents are. Our feature goes three levels deep, from the animal to its great grandparents.

Go ahead and click that "Edit" button on the top right of the pedigree chart panel. You'll see this popup:

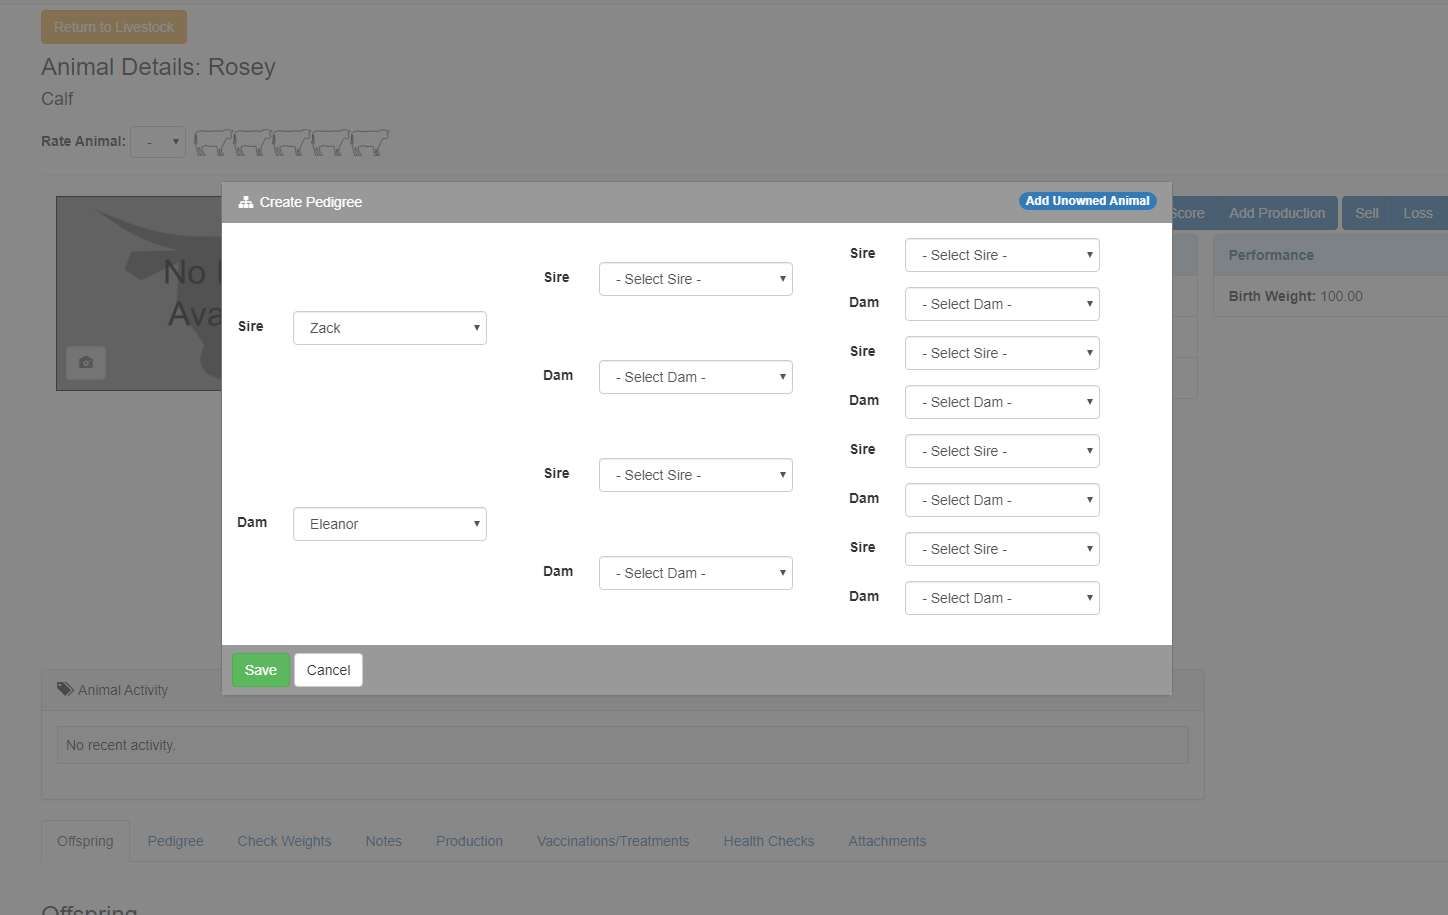
From here, you can fill in all the drop downs, and it will be saved to your animal's record! If you choose an animal that already has parents assigned, the popup will update and place those parents inside the associated parent fields. You can override these though if you need to.

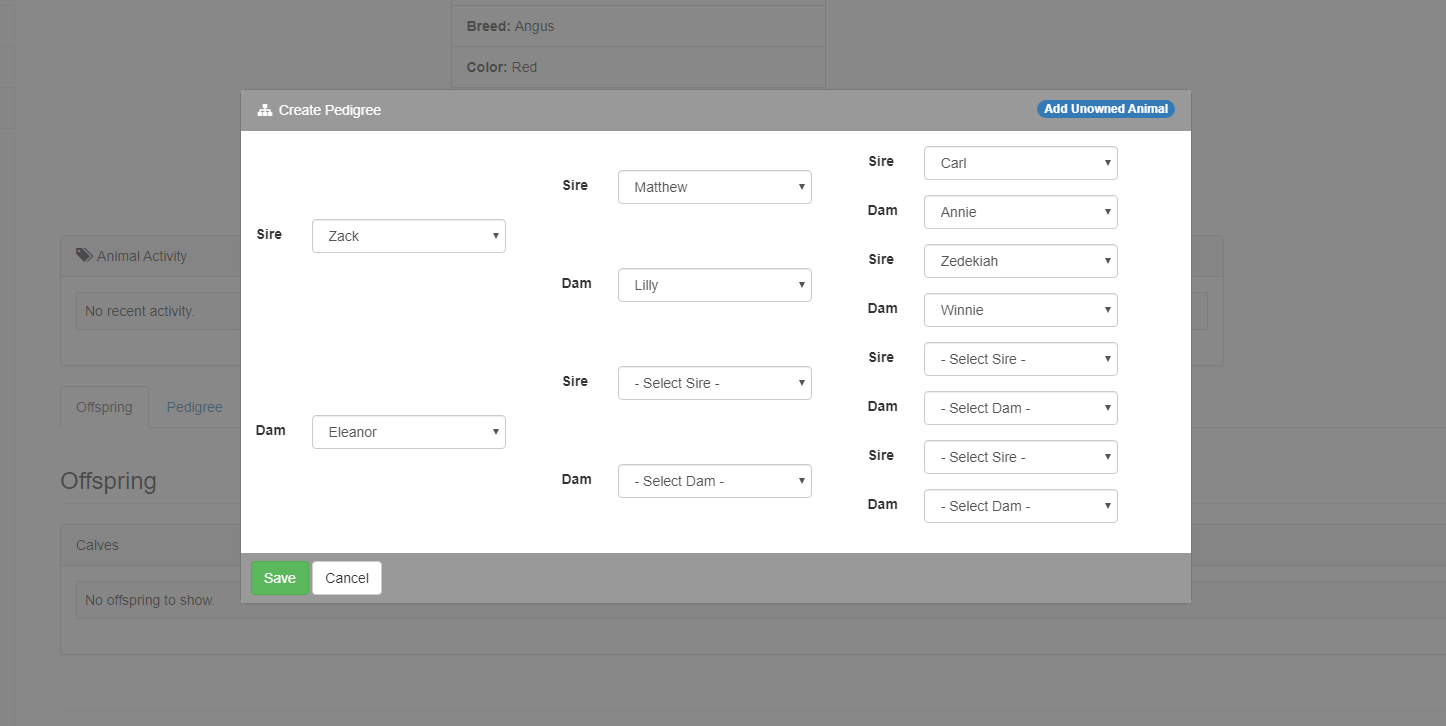
Here is a picture of Zack's ancestry after I populated all the drop downs:

Here's a question...what if you don't own the animal's parents, but you still want to record them in the pedigree chart? That's exactly what that little "Add Unowned Animal" button is for on the top right of the popup.

Adding an Unowned Animal

If you click that button. You'll see this form:

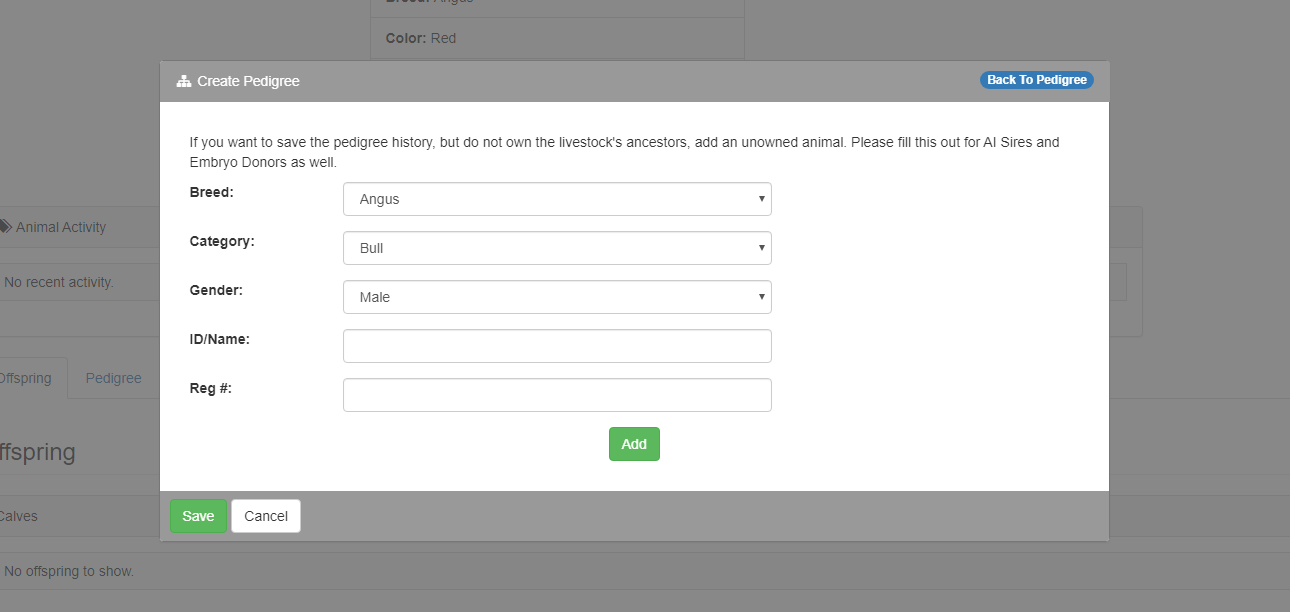
It's just the bare minimum amount of information we need to be able to record an unowned livestock. And don't worry. This will not be included in your livestock number for your subscription level. It has no effect on the amount of livestock your are managing as far as cost goes!

You may have noticed that AI Sires and Embryo Donors do not appear in the drop downs. To include them in this pedigree chart, you will need to create unowned animal records for them. It's the best way we could find to connect the two.

Fill the form out and click "Add." You'll be taken back to the original screen, and now your unowned animal will show up in the drop downs! In this example, I added two new unowned animals to be Eleanor's parents: Brad and Mina.

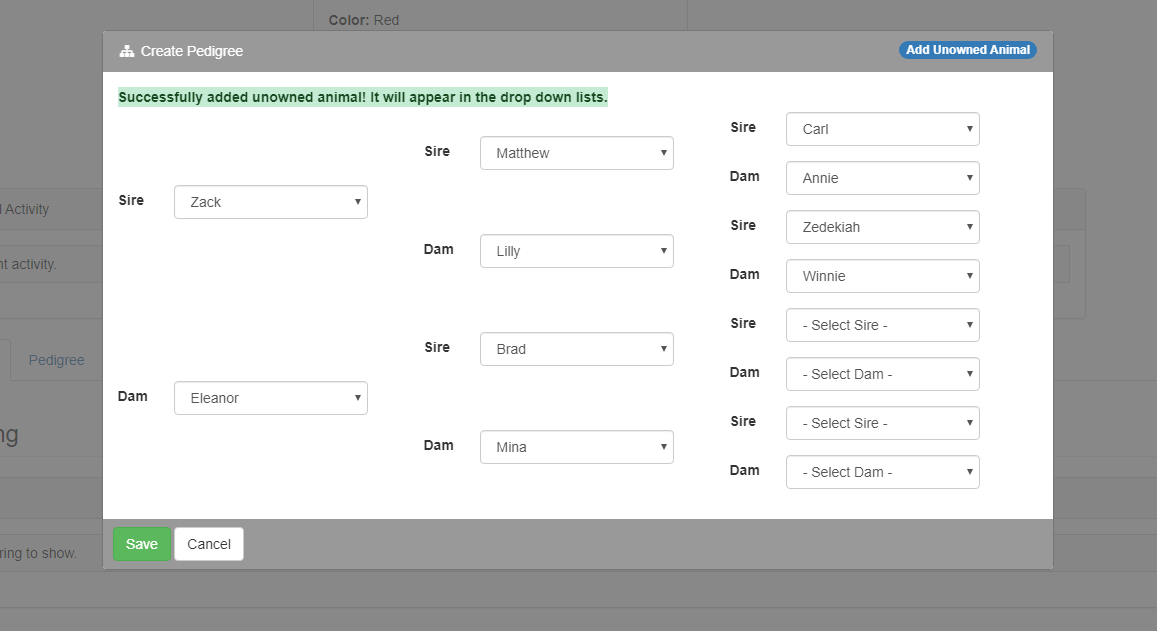
*Note that you can now also add an unowned animal from the "Add Animal" page.

You don't have to fill out the entire form. In my example, this is as far as I want to go. This is what my chart looked like after clicking "Save":

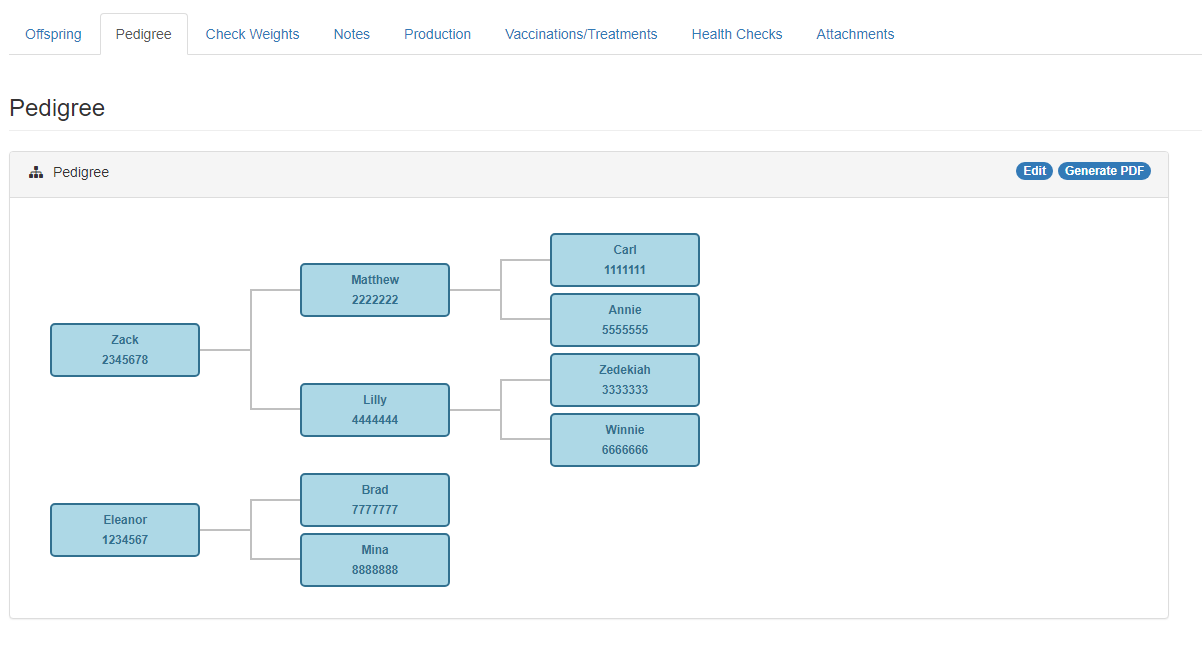
You can even print a PDF of this information. Click the "Generate PDF" button and a PDF will be downloaded to your computer.

So there you have it! We hope you enjoy this new feature and that it saves you lots of time! If you have any questions, comment below or email us at support@herdone.com.

Happy Farming!

Kasey


Treatment Inventory

For HerdUnlimited subscribers, our latest version of HerdOne includes a helpful new page called Treatment Inventory, where you can keep track of all your medicines/treatments for your animal's vaccinations. This tool keeps a running list of all your treatments, their types, costs, and amounts. Once you have filled out information about your treatments, you can go to the Vaccination/Treatments page and select the treatment you want to give to an animal or animal group and our software will track how much you used, how much is left in the container, and how much that vaccination cost you.

Treatment Inventory Page

To get started, go to Vaccines and Health Checks > Treatment Inventory and add a new Treatment. Your first entry will require you to create a Treatment Type so select "Create New." Select the type of Treatment you want: Drench, Injectable, Ingestible, Pour-On, or Spray. Then give it a name.

Congratulations! You've created your first Treatment Type. Now you'll move onto the specifics of this treatment container. Enter the Lot Number, the Amount that's in the container, and your Unit of Measurement. Then fill out the Expense-related information: Vendor, Price, and Date.

Your entry will appear on the top of the page in the grid:

Vaccinations/Treatments Page

Now that you have your first Treatment, you are ready to give a Vaccine to one of your animals. Head over to the Vaccination/Treatment page, and begin filling out vaccination information. You'll notice a new section right under the "Optional" button. The Treatment information is optional, but if you fill out one box, you must fill out the other too. 

After submitting your Vaccination, HerdOne will calculate the cost of the Vaccination which will show up on the grid at the top of the page. If you head back to grid on the Treatment Inventory page, it will display the amount left and give you a nice overview of all your Treatments.

And that's it! You can also add vaccinations with treatment information on a specific animal's Manage Animal page, and you can run a report on your vaccinations and treatments on the Reports page.

If you have any questions or comments, please let us know at support@herdone.com.

Happy Farming!

Kasey

Reminders

When everything is getting so busy, it's nice to be able to have all your to-do's in a single spot. Fortunately, HerdOne now lets you create and manage custom reminders for you and your farm. Read on to find out how to add, manage, and complete reminders for HerdOne.

Reminders Page

To add a reminder, navigate to the Reminders page from the side bar and scroll down to the "Add Reminder" section. You have four different options for reminder types: Asset, Livestock, Herd, or Pasture.

Select the type of reminder you would like to set, and then choose which asset, livestock, herd, or pasture you would like to set the reminder for from the drop down list. Then type out the reminder itself in the Description box.

You have two different options as far as the reminder date is concerned.

  1. If you want just a one-time reminder, select the date from the date picker in the Reminder Date box, and ignore the next three boxes.
  2. If you want a recurring reminder, check the Recurring Reminder check box. This will disable the previous Reminder Date box, but it will now allow you to enter a start date and the frequency with which you want your reminders to occur. The frequency options include Daily, Weekly, Semi-Monthly, Monthly, Quarterly, Semi-Annually, and Annually.

Finally, wouldn't it be nice if your reminder was emailed to you instead of you having to check the website all the time? Good news! Just check the Email Me check box, and we'll email your reminders to you on the day they are due.

Hit the "Add Reminder" button, and your latest reminder will show up in the table at the top of the page. Once you complete the reminder, just click the check box for it in the "Is Completed" column.

Your incomplete Reminders will also show up on your dashboard's Notifications Panel as shown below with a note next to it indicating whether the reminder is overdue or not.

Well, that's all for setting reminders! We hope you enjoy this new feature. 

As always, if you have any questions please email us at support@herdone.com.

Happy Farming!

Kasey

Breeding Windows

Breeding Windows

Knowing when your livestock are likely to be dropping babies on the ground is very valuable information. The following article walks through how breeding windows and subsequently, due date windows can be calculated by using the sire events on the ManagePasture page.

Pastures 

To record a turn in sire or pull sire event, first navigate to the Pastures page under the "Field Management" drop down on the sidebar. Then navigate to the ManagePasture page by selecting the name of your pasture from the pasture table. 

ManagePasture 

Once inside the ManagePasture page, you can add a Sire Turn In event. In this example, I'll be using cows and bulls. I have a pasture filled with cows, and I want to record the act of placing a bull inside this pasture. HerdOne not only records this event, but it also displays the date and even calculates the earliest and latest due dates for the cows in that pasture! "Earliest Due Date" is calculated when you turn in the sire, and "Latest Due Date" is calculated when you pull the sire from the pasture. This information will be displayed in the "Livestock In Pasture" tab down at the bottom of the page. 

Here's a step by step: 

1. Select the blue "TurnInSires" button in the top right corner of the page. 

2. Fill out the information in the box that pops up on screen. You can select one or multiple sires.

3. Click "Add Sires." Go down to the "LivestockIn Pasture" table, and notice how the cows now have a "Turn In Date" and an "Earliest Due Date." 

4. When you want to pull your sires from the pasture, just select the blue "Pull Sires" button at the top of the page, select the type of sires you would like to pull and the date you pulled them. In this example, I chose "Cattle", which will remove all three sires I placed in earlier since all three were of the type "Cattle."


This fills out the "Latest Due Date" in the table and removes the sires from the pasture: 

That's it! 

If you messed up, no worries! Just go to the "Sire Turn In Events" tab next to the "Livestock In Pasture" tab, and select the X button in the "Reverse" column. This will remove any breeding window information associated with that event, but it won't remove the sires from the pasture. You'll have to do this manually by clicking the "Remove" link from the "Livestock In Pasture" table. 

Here's a picture of the "Sire Turn In Events" table: 

After reversing the turn in event, the "Livestock In Pasture" table will look exactly the same as it did before turning in the sires.

If you have any additional questions, please feel free to email us at support@herdone.com.

Happy Farming!

Kasey

Navigating Your Settings

The settings are an important part of managing your livestock with HerdOne. They make managing and reporting on your livestock easier and more precise. They also allow you to use some of the livestock specific settings and enable or disable Widget Settings on your dashboard.

Once logged in to your account, you will see the dashboard screen. On the left is a list of pages that can be accessed to manage livestock. At the bottom is the 'Settings' menu item. Once clicked, two sub-menu items will appear. The 'Default Settings' page allows you to set default related to your livestock livestock as well as widget preferences on the dashboard. The 'Contact & Items' page allows you to manage contacts, item expenses, and bills of sale.

Default Settings

In the default settings page you are able to manage many of the default livestock settings such as your preferred livestock type, breed, herd, and form of ID. It also allows you to set value preferences for 'Ideal Sale Age', 'Gestation Period', and 'Age Considered Adult' for specific livestock types. This can be especially helpful if you manage multiple livestock types. There are built in defaults if these are not set. For example, the Gestation Period if not set by you, defaults to 283 days (https://beef.unl.edu/pregnantcows) which is the average gestation time for most cattle.

Preferred Values

Setting the 'Default Values' allows you to configure the default values which will be auto selected when you go to the 'Add Livestock' page. This saves time and effort, especially during the initial push to get your herd entered in to the application. The example below shows the settings and how they are implemented when you navigate to the 'Add Livestock' page. Notice the Type, Herd, and Breed are auto selected based on those default preferences.

Livestock Specific Settings

Another setting that can be edited are the livestock specific settings. You can change the Ideal Sale Age, Gestation Period, and Age Considered Adult. These settings are used throughout HerdOne in algorithms which help convey information back to you in a meaningful and personal way. For example, the 'Animals at Selling Age' widget on the dashboard utilizes the Ideal Sale Age value to calculate the number of livestock to include. Some settings are not automatically set for certain livestock but can be changed. These settings will need to be set after adding a new livestock type.

Widgets

Enabling and disabling the widgets that can be seen from the dashboard also occurs here. By default the Livestock Summary, Finance, Age, and Birth widgets are enabled. Ultimately, you have the ability to show any combination of widgets you like. Additional details on the information conveyed in these widgets can be found in the details portion of each widget on the Dashboard.

Contacts & Items

The Contacts and Items page allows you to edit any contacts that you have utilizes throughout the application. This includes vendors and customers that have been input through the Sales, Purchases, and Expense entry processes. If a contact is no longer needed, it can also be inactivated here. Once inactivated, it will no longer show up as an option in the Customer/Vendor specific dropdowns throughout the application. This exact process is used in the Expense Items and Bills of Sale sections as well.

Happy Farming

Adding Vaccinations

Add Vaccination

Vaccinations can be applied in two ways, through the "Vaccinations" page or the "Manage Animal" page.

Vaccinations

To have the ability to apply multiple vaccinations at once, select the dropdown menu “Vaccines and Health Checks” and then click “Vaccinations". This will display a grid of all the vaccinations that your livestock have received. Below the grid is a panel that gives you the ability to add a vaccination. This can be done in one of two ways. The first way is to choose the specific animals that you wish to give a vaccination to.

The second option is to apply vaccinations based on the herd or group that animals belong to.

Once the Add Vaccination button is clicked, those vaccination events show up in the grid on that page.

Manage Animal

To apply a vaccination to a specific animal only, navigate to the "Livestock View" and then click the ID link for the animal you wish to vaccinate. This will take you to the "Manage Animal" page where you can enter a vaccination in much the same way as you did above.

Happy Farming

Adding Animals to HerdOne

Add Livestock

Select the dropdown menu “Manage Livestock.” Then go to the “Add Livestock” page. Choosing to add a single animal allows you to input information like the animal’s dam and sire, image, castration and registration statuses, and additional attachments.

The following page will appear with different info fields. The only information required when filling out these animal records is the Livestock Type, Category, and ID. It’s recommended however that you provide as much info as possible for each animal. The birthdate and gender are important pieces of data as these are used in algorithms throughout the application to make your experience with HerdOne better.

The information that can be provided falls under purchase info, if applicable, identification, description, and familial status.

If you are still unsure about what each box entails or cannot see pastures, sires, etc. that you've added, select the blue "i" icon to the right to reveal a brief explanation and criteria as to whether it is required. If you wish to add more animals but are limited, consider upgrading to a higher tiered price plan.

Add Bulk Livestock

If you want add multiple animals at a time, from the Dashboard select “Manage Livestock,” then “Add Bulk Livestock.” This method is ideal if you have animals with a similar makeup (i.e. breed, color, age) as well as sequential numeric ID tags (i.e. 1-20).

On the purchase price and purchase weight fields, enter the total price and total weight for the lot/group of animals. An average will be calculated and assigned to each animal upon insertion.

Once the bulk add has occurred, you can navigate to the “Livestock View” page and edit an animal by clicking the pencil icon located under the “Actions” column.

Please feel free to email us at support@herdone.com if you have additional questions as well.

Happy Farming